内存优化 —— ArrayMap,SparseArray

内存优化 —— ArrayMap,SparseArray

前言

HashMap 是 Java 中常用的 map 容器,凭借着可靠的链表数组结构,在增删改查方面的性能十分优异,但是 HashMap 确有着致命的缺点——内存占用很大,因为 HashMap 中数组占用的内存是提前申请好的,在某些条件下,hash 分布并不是平均的,甚至都是同一个位置,数组其他位置内存虽然被分配了,但是并没有被使用。而且数据不断增多还会触发数组的扩容,还会加剧这种状况(这是由 hashmap 的扩容算法决定的)

所以 Android 为解决这种状态,提供了内存效率更高的 ArrayMap 和 SparseArray,值得注意的是 ArrayMap 直到 API 19 才加入到 Android 中但是在 Support 包中有提供

本文基于 Android API 27,为了直观表现截取了部分 Android 性能优化典范视频的一些截图

ArrayMap

以 android.support.v4.util.ArrayMap 为例,下面是类注释中摘抄的一段关于 ArrayMap 原理的描述

It keeps its mappings in an array data structure – an integer array of hash codes for each item, and an Object array of the key/value pairs. This allows it to avoid having to create an extra object for every entry put in to the map, and it also tries to control the growth of the size of these arrays more aggressively (since growing them only requires copying the entries in the array, not rebuilding a hash map).

ArrayMap 通过两个数组实现映射关系,一个 int 数组用来存放 hash 值,而另外一个 object 数组存放 key/value 的组合。这种方式即可以避免为放入 map 的 kv 生成一个额外的对象(HashMap.Node,维护 hash 碰撞时的链表结构),也可以避免 hashmap 扩容时需要重建 map 的开销(只需要数组的复制)。忽略 Java Container API 的需求,真正的逻辑实现在 SimpleArrayMap 类中。

基本结构

ArrayMap 有两个主要组成结构,一个是存放 hash 值的 int 型数组 mHashs,还有一个就是 key value 依次对应存放的 object 型数组 mArray。数组中的元素紧密排列,可以极大的利用内存。
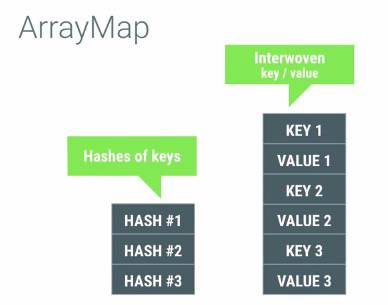
android_perf_3_arraymap_two_array

get 方法

ArrayMap.get 方法

1
2
3
4
5
@Override
public V get(Object key) {
final int index = indexOfKey(key);
return index >= 0 ? (V)mArray[(index<<1)+1] : null;
}

get 方法先从 mHashs 数组中查找到对应的 index,然后映射得到 mArray 中的 index * 2 + 1 中的 value 值,继续追踪 indexOfKey 方法

ArrayMap.indexOfKey 方法

1
2
3
4
public int indexOfKey(Object key) {
return key == null ? indexOfNull()
: indexOf(key, mIdentityHashCode ? System.identityHashCode(key) : key.hashCode());
}

根据策略选取 hashCode 的计算方法,System.identityHashCode 方法是通过对象的内存地址得到的 hashCode,继续追踪 indexOf 方法

ArrayMap.indexOf 方法

1
2
3
4
5
6
7
8
9
10
11
12
13
14
15
16
17
18
19
20
21
22
23
24
25
26
27
28
29
30
31
32
33
34
35
36
int indexOf(Object key, int hash) {
final int N = mSize;

// 数组为空时,直接返回 -1
if (N == 0) {
// 0 按位取反就是 -1
return ~0;
}

// 通过二分查找去 mHashs 数组中查找目标 hash,说明 mHashs 是有序的
int index = binarySearchHashes(mHashes, N, hash);

// 如果没有查找到,index 其实并不为 0,而是 hash 本来应该在的位置,但是为了区分 hash 在目标数组内的情况,所以对 index 做了取反操作,所以是小于 0 的
if (index < 0) {
return index;
}

// 如果查找到了 index,通过 equals 方法与 mArray 中 index * 2 位置上存放的 key 值比较,
// 相同则是我们要找的目标,value 在 mArray 中 index * 2 + 1 位置
if (key.equals(mArray[index<<1])) {
return index;
}

// 产生 hash 碰撞时的处理逻辑,前后查找是否有符合的 key 值
int end;
for (end = index + 1; end < N && mHashes[end] == hash; end++) {
if (key.equals(mArray[end << 1])) return end;
}

for (int i = index - 1; i >= 0 && mHashes[i] == hash; i--) {
if (key.equals(mArray[i << 1])) return i;
}

// 未找到,而这里的 index 则是靠后的位置,这样做是为了添加元素时数组拷贝尽可能的少
return ~end;
}

查找的逻辑比较简单,mHashs 数组是个有序数组,所以查找时可以使用二分查找(时间复杂度 O(log2n)),查找到 hash 的index 后可以去 mArray 中找到 key 比较来确定是否是我们要查找的 key,因为是两倍关系,可以通过位操作来提高性能。
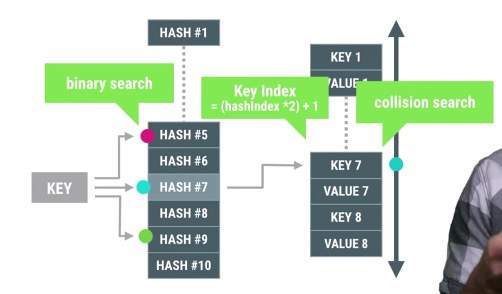
android_perf_3_arraymap_binary_search

既然 mHash 是有序的,那么插入删除操作必须有排序的过程

put 方法

ArrayMap.put

1
2
3
4
5
6
7
8
9
10
11
12
13
14
15
16
17
18
19
20
21
22
23
24
25
26
27
28
29
30
31
32
33
34
35
36
37
38
39
40
41
42
43
44
45
46
47
48
49
50
51
52
53
54
55
56
57
58
59
60
61
62
63
64
65
66
67
68
69
70
71
72
73
public V put(K key, V value) {
final int osize = mSize;
final int hash;
int index;
// key 为空时处理
if (key == null) {
hash = 0;
// key 为空,hash 即为 0,这里需要单独处理
index = indexOfNull();
} else {
hash = mIdentityHashCode ? System.identityHashCode(key) : key.hashCode();
index = indexOf(key, hash);
}
// 如果已存在 key 则只需要替换掉对应的 value 即可
if (index >= 0) {
index = (index<<1) + 1;
final V old = (V)mArray[index];
mArray[index] = value;
return old;
}

// 虽然 hash 不在数组中,但是 index 就是该 hash 值应该在 mHashs 中的位置,只不过取了反,所以这里需要再取反,得到的 index 就是需要插入的位置
index = ~index;
// 数组的扩容操作
if (osize >= mHashes.length) {
// 扩容逻辑是小于 4,扩容到 4
// 大于 4 小于 8,扩容到 8
// 大于 8 扩容 1.5 倍
final int n = osize >= (BASE_SIZE*2) ? (osize+(osize>>1))
: (osize >= BASE_SIZE ? (BASE_SIZE*2) : BASE_SIZE);

if (DEBUG) Log.d(TAG, "put: grow from " + mHashes.length + " to " + n);

final int[] ohashes = mHashes;
final Object[] oarray = mArray;
// 生成数组,对 4,8 容量有缓存处理
allocArrays(n);

if (CONCURRENT_MODIFICATION_EXCEPTIONS && osize != mSize) {
throw new ConcurrentModificationException();
}

// 数组拷贝
if (mHashes.length > 0) {
if (DEBUG) Log.d(TAG, "put: copy 0-" + osize + " to 0");
System.arraycopy(ohashes, 0, mHashes, 0, ohashes.length);
System.arraycopy(oarray, 0, mArray, 0, oarray.length);
}

// 原有的数组中的 4,8 容量数组会被缓存,这样可以防止低容量数组操作时的内存抖动
freeArrays(ohashes, oarray, osize);
}

// index 对 hash 碰撞情况下的插入位置也做了优化
if (index < osize) {
if (DEBUG) Log.d(TAG, "put: move " + index + "-" + (osize-index)
+ " to " + (index+1));
System.arraycopy(mHashes, index, mHashes, index + 1, osize - index);
System.arraycopy(mArray, index << 1, mArray, (index + 1) << 1, (mSize - index) << 1);
}

if (CONCURRENT_MODIFICATION_EXCEPTIONS) {
if (osize != mSize || index >= mHashes.length) {
throw new ConcurrentModificationException();
}
}
mHashes[index] = hash;
mArray[index<<1] = key;
mArray[(index<<1)+1] = value;
// 数据大小增加
mSize++;
return null;
}

虽然逻辑简单,但是设计地十分严谨,为了保证数据小容量下的频繁插入操作,有选择性的做了缓存数组。为了尽量少的拷贝数组,对 index 插入位置也做了优化,选取了数组靠后的位置。 remove 方法也类似,只是在数据大小大于 8,小于三分之一数组大小时会缩减数据,移除数据时也会做数据拷贝。ArrayMap 不支持并发操作

遍历

鉴于数组的结构,对于 ArrayMap 的遍历是十分高效的,我们可以直接使用数组下标访问对应内容

1
2
3
4
5
for(int i = 0; i < map.size(); i++){
Object key = map.keyAt(i);
Object value = map.valueAt(i);
...
}

值得一提的是,空的 ArrayMap 并不会占用内存。虽然 ArrayMap 对于节省内存方面做了许多优化,但是这种数据拷贝的方式在大数据场景下其实是非常浪费性能的。所以 ArrayMap 适用于数据量千以下的使用场景

SparseArray

HaspMap 的另一个缺点就是存放的 key/value 都必须是对象,对于以基本数据类型(boolean, int, long等)需要存入的是其包装类(Boolean, Integer, Long等),对于 HaspMap 的增删改查很容易产生大量自动拆装箱操作,这是很影响性能的。因此 Android 提供了一下容器来替代这种基本数据类型下的 map 操作。

class \<key, value>
SparseArray \<int, obj>
SparseBooleanArray \<int, boolean>
SparseLongArray \<int, long>
LongSparseArray \<long, obj>

下面以 SparseArray 为例,对其中的优化进行追踪说明

基本结构

与 ArrayMap 相似,有个两个数组,一个是存放 key 的 int 型数组,另一个是存放 value 的 object 数组,相对于 ArrayMap 来说简化了不少,因为 key 本身就可以看做是 hash 了。

get 方法

SparseArray.get 方法

get 方法调用了 get(key, valueIfKeyNotFound) 方法

1
2
3
4
5
6
7
8
9
public E get(int key, E valueIfKeyNotFound) {
int i = ContainerHelpers.binarySearch(mKeys, mSize, key);

if (i < 0 || mValues[i] == DELETED) {
return valueIfKeyNotFound;
} else {
return (E) mValues[i];
}
}

和 ArrayMap 一样,key 数组也是有序的,通过二分查找寻找目标 key,只是这里少了 hash 产生碰撞时的逻辑。而且这里有一个 mValues[i] == DELETED 的判断,说明删除时的逻辑和 ArrayMap 不同,是以一个 DELETED 去替代,省去了数据拷贝相关操作。先查看 remove 操作再追踪 put 方法查看扩容相关逻辑。

remove & put

remove 其实调用的是 delete

1
2
3
4
5
6
7
8
9
10
public void delete(int key) {
int i = ContainerHelpers.binarySearch(mKeys, mSize, key);

if (i >= 0) {
if (mValues[i] != DELETED) {
mValues[i] = DELETED;
mGarbage = true;
}
}
}

delete 在只是在将要移除的 value 指向一个 DELETED 引用,并将 mGarbage 标志位置为 true,意味着数组中有被移除的数据

1
2
3
4
5
6
7
8
9
10
11
12
13
14
15
16
17
18
19
20
21
22
23
24
25
26
27
28
29
30
31
32
public void put(int key, E value) {
// 查找目标位置
int i = ContainerHelpers.binarySearch(mKeys, mSize, key);

if (i >= 0) {
mValues[i] = value;
} else {
// 未找到,取反获取插入位置
i = ~i;
// 如果不需要扩容,而且对应位置有值且是被移除的了,重新赋值
if (i < mSize && mValues[i] == DELETED) {
mKeys[i] = key;
mValues[i] = value;
return;
}

if (mGarbage && mSize >= mKeys.length) {
// mGarbage 标志着有移除操作,需要 gc 操作去调整数组
gc();

// 位置改变需要重新计算插入位置
i = ~ContainerHelpers.binarySearch(mKeys, mSize, key);
}

// 提供的插入方法,逻辑比较简单
// 拷贝插入位置后的数据往后一格
// 扩容逻辑:小于 4,扩容到8,否则两倍扩容
mKeys = GrowingArrayUtils.insert(mKeys, mSize, i, key);
mValues = GrowingArrayUtils.insert(mValues, mSize, i, value);
mSize++;
}
}

SparseArray.gc 方法

1
2
3
4
5
6
7
8
9
10
11
12
13
14
15
16
17
18
19
20
21
22
23
24
25
 private void gc() {

int n = mSize;
int o = 0;
int[] keys = mKeys;
Object[] values = mValues;

for (int i = 0; i < n; i++) {
Object val = values[i];

if (val != DELETED) {
if (i != o) {
keys[o] = keys[i];
values[o] = val;
values[i] = null;
}

o++;
}
}

mGarbage = false;
mSize = o;

}

逻辑比较简单,就是如果对应位置已经被删除了,那么就把后面的数据往前拷贝,最后剩下的置为 null,操作后保证前 o 个数据是有效的,剔除了被移除数据

可以看出 SparseArray 的删除操作是非常有效率的,但是缺少了减小数组的相当操作

结语

Android 为